
Enrolments are records of individual students enrolled into an intake (and therefore programme). Enrolments are always specific to an individual learner. In order to enrol a student, you need a student record, a curriculum (programme) and the offering of a curriculum through an intake.
Manage Enrolments
Navigate to Enrolments -> Manage Enrolments

To search for a specific student follow our detailed guide on using SELMA’s standard grids
Once you locate the desired enrolment/student, click on the enrolment id link in the search result grid which will forward you to the enrolment of the student. If there is no enrolment and you would like to enrol a learner follow the next step in this manual.
Enrolling a Student
Before you begin enrolling a student please ensure that their Student Status is set to “Ready”, otherwise they will not be able to be enrolled.

Navigate to Enrolments -> Enrol Student
Select the correct Intake into which you want to enrol the student (Intake must be created and set to ‘Open’). Next, select whether you want to enable Attendance for the student, so that you can keep track of this.

Enrol with ‘Confirmed Status’
Selecting this field means that, upon enrolment, the student becomes “Confirmed” straight away and the enrolment becomes SDR committed.
You can Provisionally enrol a student by not ticking this field and later change the status of the enrolment to “Confirmed”, with the Status Wizard, to commit the enrolment to SDR.
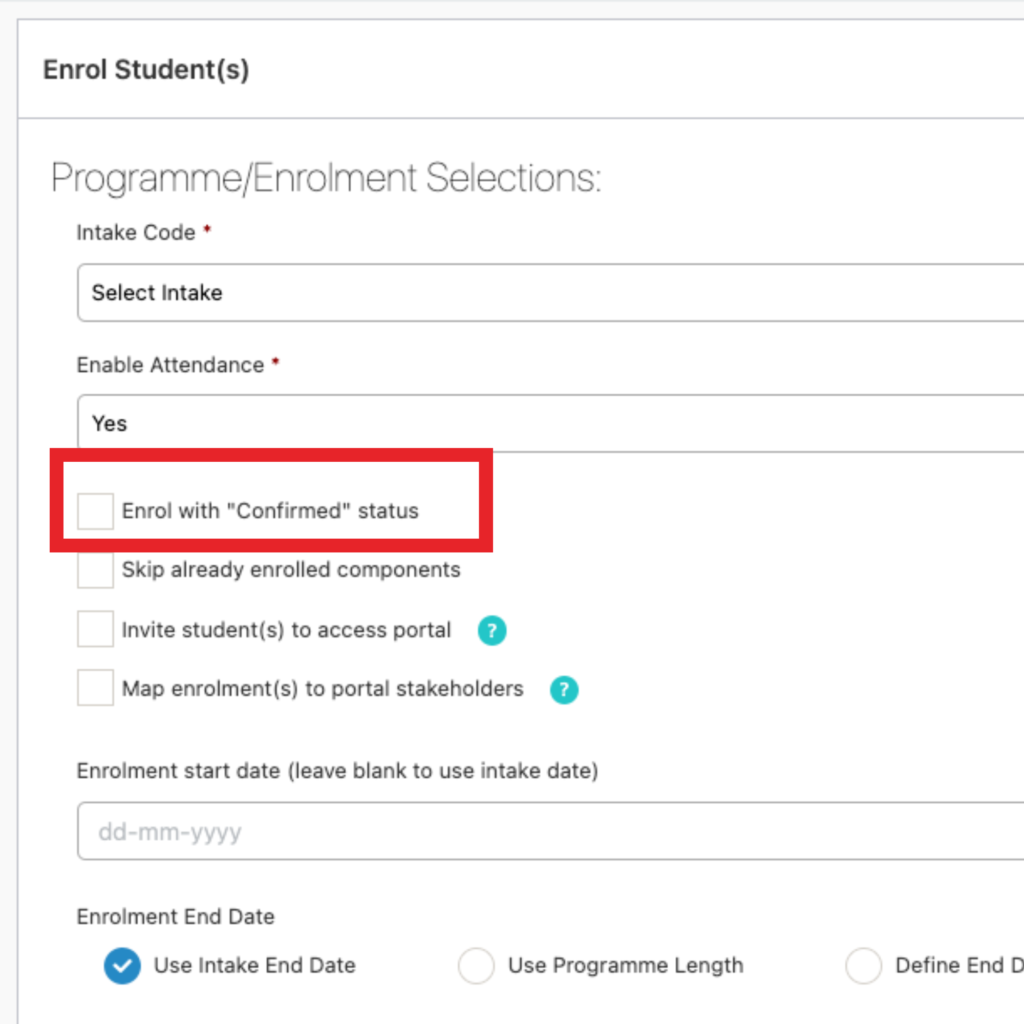
Enrolling a student with this check box ticked will result in the enrolment status automatically being set as “Confirmed” –

This step will also automatically generate a note entry in the student’s Events Log notifying the user of the time and date of the confirmation date/time.
Skip ‘Already Enrolled Components’
If this option is selected, the system will omit components where the student is already enrolled in the same component from another enrolment event. This is also applicable if the student has completed this component with your provider in another enrolment event.
– Enrolment Start Date
Enter the date that you would like to use as the Enrolment Start Date into this field.
– Enrolment End Date

You can choose from three options when selecting an Enrolment End Date according to your needs as an education provider – Intake End Date, Use Programme Length, Define End Date.
Use Intake End date – Populates the Enrolment End date with the same end date as the selected Intake
Use Programme Length – This will calculate the end date based on the programme length
Define End Date – Users can manually input the end date
Note: SELMA runs a validation check to make sure that the selected End Date is after the Enrolment Start Date. Otherwise, SELMA will generate an error.
Calculator Function
To access this feature, from the SELMA dashboard, go to Enrolments -> Enrol Student.


The “Start Date” will have already been pre-populated. Either manually enter a value into the “Add to Date” field, or use the counter figure that pops up in the field when you hover over it with your mouse (Select unit value of days, weeks, or months). As you manipulate these fields, you will see the “End Date” figure change accordingly. This is the calculator function automatically calculating the End Date based on the information provided.
When satisfied with the End Date complete the process by clicking the blue “Use” button. This will input the calculated End Date into the “End Date” field in the Enrol Student form.
Time to Enrol Students
The final step is for you to select the students to enrol under the conditions you specified in the field above. To do this, locate the students you want to enrol in the left hand column –

Click once on their names and this should automatically take them out of the left hand column list of names, and put them in the right hand column list of names. Repeat this process for all the students you want to enrol.
Once you have completed all relevant sections, and added all the students that you want to enrol to the right hand list of students, click the blue “Enrol Students from the List” button.
Upon successful enrolment, you will be shown a “Successful” screen, which will also allow you easy access to make any edits to the individual successful enrolments.
Edit Enrolment
You can edit enrolment information on this screen –

In the enrolment screen, you can change Start and End dates, select the return type (e.g. if you no longer want to report it through and SDR) or enable/disable attendance tracking. You may also be able to delete the enrolment if it was only just created.
Enrolment Status
By default, an enrolment’s status will be provisional. To change this, please use the Status Wizard. You will have to change the status to “confirmed” in order to report the enrolment through SDR. The only way to change the Enrolment Status in SELMA is to use either the Withdrawal or Status Wizard native functions in SELMA.


Please note: The Status Wizard only displays actions that are selectable and readily applicable to the enrolment itself. If an option does not apply to a particular enrolment, it will not be displayed.
Component Information
By selecting this, all the relevant components within the enrolment will also now be set to “Confirmed”. As in Intakes, you can now AdHoc more components or edit the individual components (e.g. to process a cross credit etc.)

To edit a component, click the pencil button. To delete it click the cross. Teachers can add a mark to a component (e.g. if it was assessed by a teacher) by clicking on “add”. You can view all marks by clicking on “View”. There is unlimited attempts for a component that can be marked liked this. Successful marks can then be further processed by an Administrator or Registrar for official reporting – see Confirm Marking (grid).
Edit Component
When clicking on the pencil button, you can edit all information of a component. This is information for this individual student’s enrolment only. It will not change any curriculum information or the information in the intake.

Equally you can add marks and view marks (Teachers can only see this section, they can not edit a component):

Component Due Date
Users are able to add a due date to components within a student’s enrolment. This will help alert users of a component’s deadline for a certain enrolment and can therefore help administrators organise if the student is not on track to meet this due date. To add a component due date, please click the “Edit Enrolment” button within an enrolment. Then, navigate to the relevant component row item, and click the pen and paper icon on the same line, which should now be green colour. This will bring up the following slide-in page for the user:

Then the user is free to add in a due date for the component in the field highlighted in the above screenshot if required, and then click “Update Enrolment” to save changes. This will update the component with the inputted due date. If this field has not been manually updated by SELMA users, it will automatically be populated based on the order of delivery of the component and the component’s length.
Enrolment Component Credit Calculator
When SELMA users go into an enrolment component and make an edit to the “credit” field, SELMA will alert the user that the component credits have changed, and asks the user whether they would like to change the components’ EFTS figure accordingly in line with this credits field change as well.


If the user agrees, then both the Credits and EFTS (SDR) fields will be updated simultaneously, the EFTS field changing in proportion to the amount of credits entered into the Credits field.

Users will appreciate this change as credits are linked to EFTS value under NZQA, so a change in one will inevitably have bearing on the other. This lets users alter the credits field, and prevents them from forgetting to update the EFTS value accordingly. Failure to do so could result in incorrect EFTS figures being reported through to NZQA.
Enrolment Event Log
As in the Event Log section for students, you can add unlimited notes for enrolments. Automated notes may also be added when e.g. withdrawing a student.
Programme Outcome
In this section you can view and edit a student’s programme outcome as a grade. Complete this section as fully as you can, paying particular attention to fields with an asterisk (*) next to it as these have implications for SDR reporting.


Fees
When enrolling a student, all relevant fees from the curriculum setup and the intake are compiled and fee lines created. You can now choose to add additional fees like uniform or fees for additional units etc. You can now also post the fee lines to XERO if you have a XERO integration. If you want to print an invoice out of the system, talk to us about an invoice template. We will set it up for you.
Public Trust
The Public Trust area allows you to transfer information to Public Trust and automatically create a PT account for your learner.

In general, all known fees will automatically populate on enrolment. You can however add more costs into this screen (e.g. Living Expenses). If you have added more fee lines in the Fees section, click ‘refresh fees’ to transfer them across. If you are happy with the information, click “Submit to PT”. For tracking purposes, we recommend writing the Trust Number back into the enrolment.
Alumni
The enrolment outcome screen is all about the learner’s post study activities. This screen will help you track details on what your graduates are up to. Gathering this information is becoming more and more relevant for TEC and PTE’s.

Tutor Editing Rights For Alumni Tab
Users with tutor level access can edit the “alumni” tab in student enrolments. This allows tutors to enter key details in relation to a student enrolment, particularly to do with their activities after completing studies with the provider, such as employment information.
Withdrawal Wizard

In order to withdraw a student from SELMA, it is best to use our native Withdrawal Wizard function. This Wizard will help you process a programme withdrawal, and the corresponding withdrawals from the underlying courses.
In the student’s enrolment, click on Enrolment Actions and select the Withdrawal Wizard, select Action, choose a withdrawal date and a Reason. Add notes if desired. Click the Process button.

Various Scenarios

SELMA’s native Withdrawal Wizard – like the Status Wizard – will only display action options that are readily applicable to the enrolment. If a certain action does not apply and therefore is not appropriate, SELMA will not display the action as a selectable option for the user to implement.
Finish a Learner’s Enrolment: Finish Incomplete
If a learner is no longer with you, the enrolment is most likely withdrawn. In this case, make sure that the withdrawal has been processed properly. To do this, it is best to use the Withdrawal Wizard as this pre-populates the most appropriate options for that enrolment. The enrolment status can only be changed using the Withdrawal or Status Wizards, and cannot be altered manually.
In the enrolment component info, the screen could look like the example below. Some completed and some incomplete and withdrawn components.

Finish a Learner’s Enrolment: Finish Completed
To finish a learner with a successful completion, change the Enrolment Status to “Finished and Completed” (make sure the enrolment is at confirmed status before you do so). If the student has not completed all components, a warning will pop-up, but you will still be able to change the status to “Finished and Completed.”

All completed components will be reported through the SDR. And finally, in the Programme Outcome tab, make sure the completion date is entered and the completed successfully box is ticked:

Printing Certificates
Once you have completed this process, you will have access to printing the relevant certificates. Please check article on Compliance Reporting for further steps.
Editing Enrolment Programme Outcome
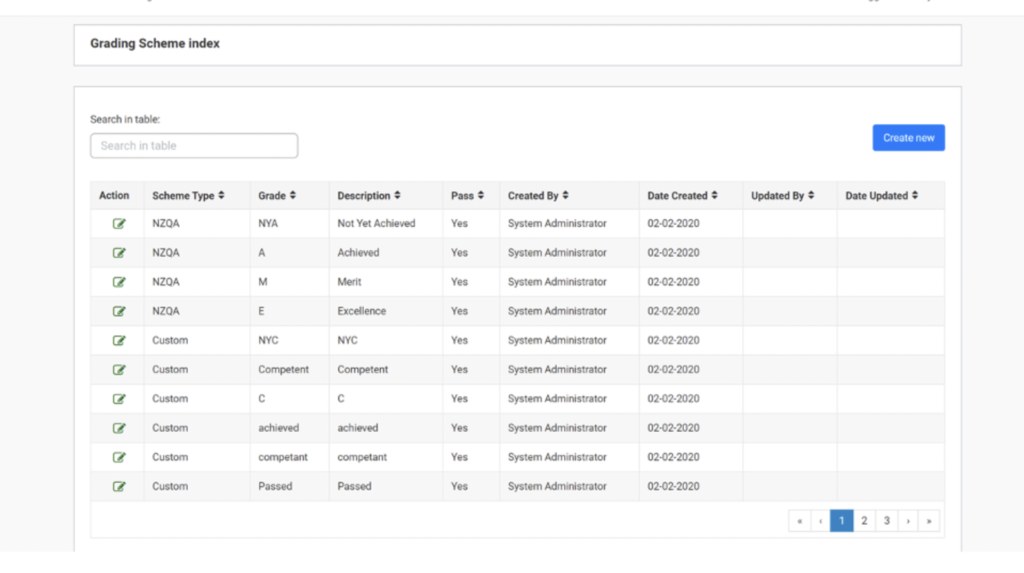
When a user updates a student’s grade in the programme enrolment outcome section, instead of manually entering the grade, users can select from a drop down menu that populates grades that the user sets in the “Grading” section of SELMA:

To customize the grades that appear in this drop down menu, the user needs to go to the “Marking” tab, and then select “Grading Scheme” to make relevant changes (see following section).
Grading Scheme
You can create, alter, and change grade marking schemes. To do this, click the “Marking” tab along the top of the dashboard, then click “Grading Schemes”. From here you can create your own grading scheme or edit existing ones to suit your education provider.
Confirm Marking
When clicking on the top menu item “Marking -> Component Marking” you get to the component marking screen. It allows you to have a two-step validation of the marking of your students’ work.
The first step can be performed by teachers (marking individual components). An administrator or registrar can later review the marking before it is submitted via SDR.
The list shows all components that are marked as “Completed” by a teacher. The Registrar can now click on the link of the Enrolment ID to mark the component as successfully completed (Outcome 2 – Reported through SDR) or add additional marks.
Once the component is marked as an Outcome 2 it will disappear from this view.

Cross Crediting Components
If you have imported or entered record of achievement (RoA) unit standards for a student and you enrol the student in a unit standard that is already in the students RoA, it will cross credit automatically. This only applies to NZQA registered, achieved unit standards.
To cross credit a component manually, go the enrolment component screen and click on the edit button of the component you would like to cross credit.
In the MoE Completion Code drop down field, choose “Recognition of Prior Learning (Cross Credit)”. If there is EFTS, set it to 0.

After updating the component, make sure you save the enrolment form. When you go back to the components, the completion code should now show “X”
Enrolment Measures

On the top right, the user will see a summary in graph format of the following for the enrolment: attendance, time in programme, and progress percentages.
Component Screen Changes

On the component screen, there is: the Total EFTS measure, the Total Components measure, and also the component progress % figure. The component progress % measure assists the user to quickly know how far through a student has progressed in a certain enrolment.
Quick Measures in Enrolment Search Grid Index

The far right columns of the enrolment index displays the percentage figures for the enrolment attendance %, time in programme %, and progress percentage, for each enrolment, allowing users to quickly assess a student’s attendance, progress, and duration in programme at a moment’s notice while scrolling for enrolments.
Progress Measurement Settings in Programmes
The user can change this field to select whichever measure is most beneficial to them as a metric for their activities as an educational provider.
The options are: component count, component credits, component EFTS. Whichever one is selected by the user is what will be used to drive the progress measurement metrics for the programme.
By default, progress will be calculated on a Component Count basis.
To locate this information, go to the “Curriculum” section, locate the programme to change, click into it, click “edit”, then scroll to the bottom of the page.
Enrolment Progress Report Transcript PDF File Download
Please follow the steps below to get an enrolment transcript for a student enrolment progress transcript as a pdf file.
First, in the enrolment index, locate the enrolment for which you would like to get a pdf progress transcript of. Once you have located this, open it up so that you can see the enrolment information screen and the various tabs that are available within the enrolment.
Next, click onto the “Components” tab. Then, click onto the blue “Transcript” button (for some users, you will have to click on the “Edit Enrolment” button first before this button becomes available to you).
When you click the blue “Transcript” button, a new tab in your browser will open, displaying the pdf file of the transcript. From here you can view the available information and/or download the pdf file to your local machine for further use.
Of course, the information captured in the pdf file is available within the component screen of the enrolment to begin with. Being able to download the pdf version allows users the freedom and flexibility to have static reports that can be saved to their local computer system for further use.

Transfer Enrolments
This functionality allows users to transfer an enrolment from one intake to another. Students cannot be transferred to a different programme via this method.
To begin, go to the Enrolments search grid and locate the enrolment that you would like to switch. Open this up so that you see the enrolment screen:

Select ‘Enrolment Actions’ and then click on SELMA Transfer.

Once this has been done, the user will be presented with the following window:

This drop down menu present the user with available intakes, from the same programme, into which they can switch the selected enrolment. Once you select to Transfer the Enrolment, you will be presented with this pop-up alert:

If the user clicks the green “Yes, Transfer it!” button, this will confirm the transfer, close the window, and a green success message will be presented to the user in the enrolment screen, prompting the user to refresh the page.
If the user clicks the red “Cancel” button, this will cancel the current transferring process and return the user to the selected enrolment screen
Extending a Student’s Enrolment
When extending a student’s enrolment, make sure that the MoE completion code is set to ‘0’ and then add an extension date.

The course end date cannot and should not be changed under these circumstances. As a general rule, course dates can only very rarely change due to this having an impact on the SDR.
The important fields to check would be in the relevant enrolment components, and making sure that the MoE completion code is set to ‘0’ (extension) and that an extension date is entered in for these components.
On a higher-level – and as a general rule when navigating SELMA – always strive to use one of the available Wizards when making big changes to an enrolment. It is not advisable to manually change the enrolment status’ in isolation.
Funding Source Changes – Intakes/Enrolments
When editing a funding source for Intakes/Enrolments the following pop-up messages will appear:

Date Changes in Enrolments and Intakes
When changing dates in Enrolments and Intakes, SELMA runs a validation check to make sure that the relevant end date is after the relevant start date. Otherwise, SELMA will throw an error, like the following:

Changing the Start/End Date of an Intake or Enrolment
When a user goes to change the start and/or end date of an enrolment or of an intake, they will be presented with a pop-up message like the following one that alerts them. This pop up message flags to the user that the change of the start/end date will also apply to the related intake or component enrolments at the same time as well. Please see the following screenshot as an example:
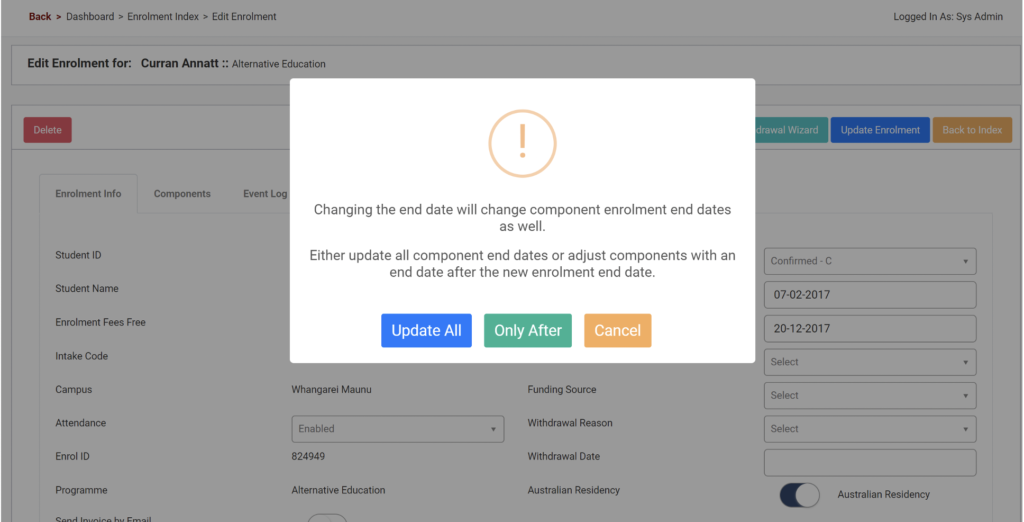
The user can choose one of the following options to proceed with. The logic behind these options will apply in a similar fashion to changes to enrolment and intake start and end dates:
Update All: selecting this button will update all components of the enrolment or intake to match the new elected start/end date
Only After: selecting this button will update only those components of the enrolment or intake with a date that falls outside the new elected date boundary.
For example: in the above example, the user is attempting to change the enrolment end date. In this case, the message alerts the user that they have the option to adjust only those components with an end date that is after the new enrolment end date.
Another example would be if the user is attempting to change the enrolment start date. In this case, the message would alert the user that they have the option to adjust only those components with a start date that is before the new enrolment start date.
Cancel: cancels the change that the user started to make, and returns user back to the “edit” screen